A Vim Tutorial
Masterclass
History of VIM
Vim has a long history that can be traced back to at least the late 1960s. It is useful to know a little bit about its history in order to understand the peculiarities of Vim. We will give a brief overview here (for an in-depth article, see Where Vim Came From).
1969: ed by Ken Thompson & Dennis Ritchie
Ken Thompson and Dennis Ritchie were working at Bell Labs when they decided to
write an operating system for their own use. This system would eventually
become known as Unix, which is the basis for the Linux, macOS, iOS and Android
operating systems. Within the same project, they also developed the C
programming language and the ed command-based editor. The ed program is
part of the POSIX
standard,
so if you have a POSIX-compliant operating system like Linux or macOS, it is
installed on your computer.
If you fire up ed in your terminal, not much will happen initially. In fact,
ed simply greets you with a blank screen. At that time, computers did not
have screens like modern computers. Instead, computer output was printed on
paper. This made it a costly operation to actually show you the file you were
editing. Thus, the ed program does not give you any information about the
file you are editing until you explicitly tell it to print out the file or some
part thereof. Moreover, you have to interact with ed using a set of
commands, like you would interact with a shell. Even though this mode of
editing seems archaic today, its influence can still be seen in the
command-line mode of Vim.
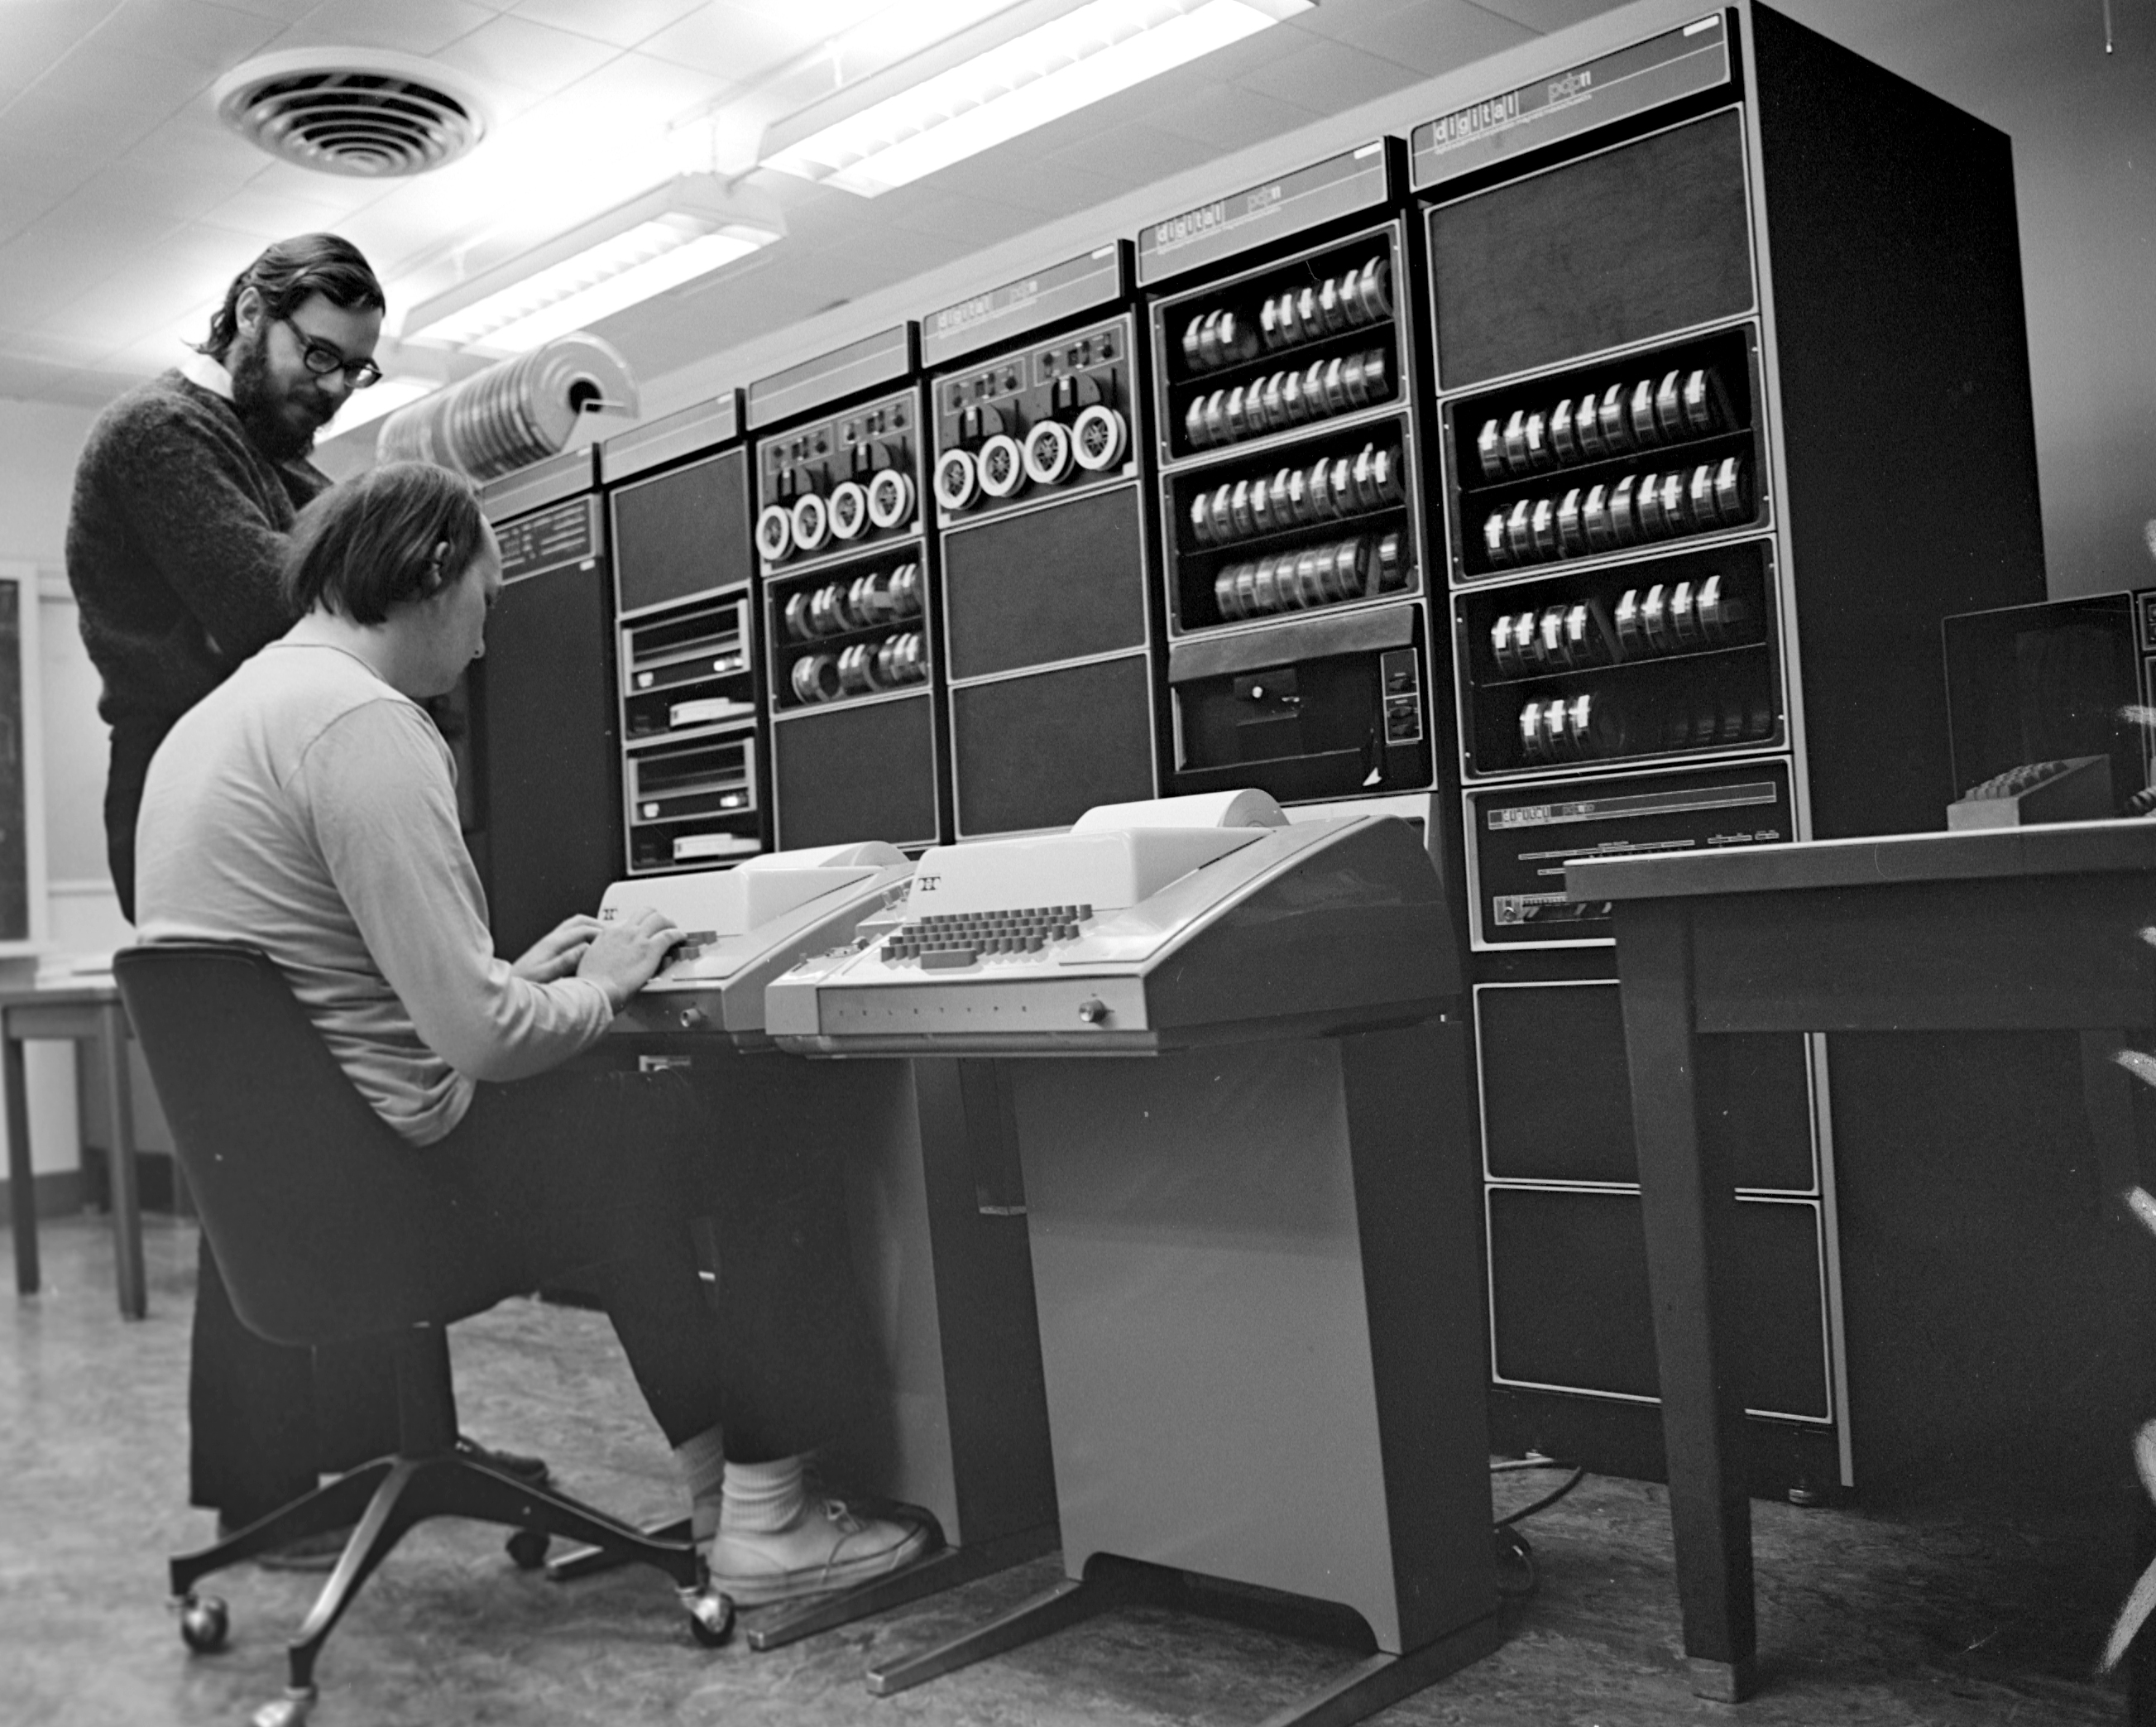 Ken Thompson and Dennis Ritchie at Bell
Labs
Ken Thompson and Dennis Ritchie at Bell
Labs
1975: em by George Colouris
A few years later, George Colouris at Queen Mary’s College in London had access
to a computer system with a video display and wrote an improved version of ed
for it. His version of ed was able to display one line of text at a time, so
that you could at least see the line you were editing. Legend has it that the
editor was instantly dismissed by Thompson when he paid a visit to the
Coulouris’ lab, saying that he had no need for seeing the state a file when he
was editing. This led Coulouris to name his editor em, which stands for
editor for mortals.
1979: vi by Bill Joy
In 1976, Colouris brought em to UC Berkeley as a visitor to the Computer
Science department. There, he met Bill Joy, who was a graduate student at the
time, and would later co-found Sun Microsystems (known for the Java programming
language, among other achievements). Joy was inspired by em and developed
his own ed-like editor, starting from Colouris’ source code. The editor was
called ex for extended ed. It was capable of interactive line-editing
like em, but also included a “visual” display mode, where the entire screen
was used to show the state of the file, like we are used to today. In 1979,
the vi (visual) executable was released, which opened the ex editor in
visual mode. Today, Vim commands that are prefixed with : are still called
ex commands.
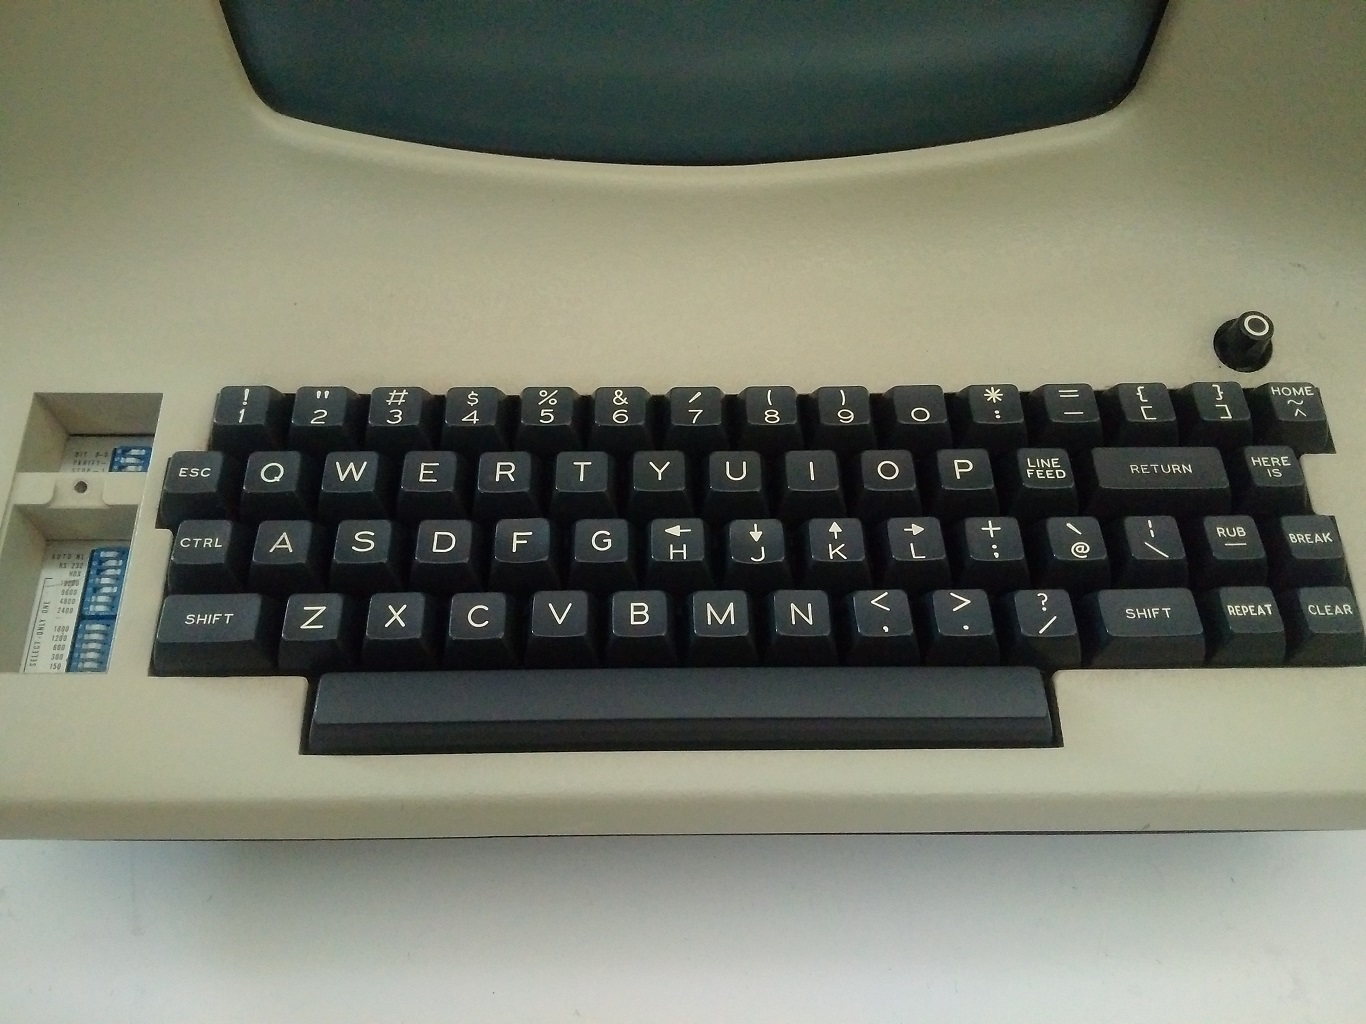 The keyboard model that Joy was using while designing
vi
1991: vim by Bram Moolenaar
The vi editor quickly became very popular among computer scientists and
hackers. However, due to licensing issues, the official distribution was only
available on a limited number of systems. This lead to the emergence of vi
clones with more permissive licensing in the late 1980s and early 1990s. In
1988, Bram Moolenaar, a Dutch software engineer, started developing Vim, which
originally stood for “Vi iMitation”. The first version was released in 1991,
the same year as the Linux kernel by Linus Torvalds. Since 1993, a more
powerful version of Vim with added features was released, leading Vim to be
rechristened as “Vi iMproved”.
Basics
The best way to become familiar with Vim is through practice. This document was therefore written as a text file that you should open in Vim to become familiar with Vim commands. You can download the file here (download the raw text file by clicking on “Raw”). Please note that the rest of this report is meant to be viewed in Vim and may therefore look weirdly formatted in a browser.
This section contains the basic commands that you need to get started in Vim.
It is also highly recommended to go through the builtin Vim tutorial, which is
accessed by typing vimtutor in the terminal. Most of the things discussed in
this section will overlap with the builtin tutorial.
Modes
Vim is a modal editor. This means that you are always in a specific mode that responds differently to your keystrokes. There are four main modes:
- Normal mode: this is the default mode. You can quickly scroll through files, move the cursor, delete and copy-paste text in this mode. You also have quick access to other modes from normal mode.
- Insert mode: this is the mode you enter to insert text. In insert mode, normal keystrokes are directly translated into characters that are inserted at the place of the cursor.
- Visual mode: this mode enables you to select a region of text, which you can then copy, delete or replace. Note that this is distinct from the “visual display mode” mentioned earlier when discussing the history of Vim. For all intents and purposes, you are always in “visual display mode” when using Vim.
- Command-line mode: this mode allows you to execute
excommands. Although you will typically not use the command-line mode to edit text in the old-fashioned manner, manyexcommands are still used to perform file-related actions, text substitutions and accessing Vim help.
It is always possible to return to normal mode by pressing the Escape button on your keyboard.
Motion
Vim has many normal mode commands to move the cursor around quickly. The commands to move a single character are:
h: move cursor one character leftj: move cursor one character downk: move cursor one character up-
l: move cursor one character right^ k Hint: The h key is at the left and moves left. < h l > The l key is at the right and moves right. j The j key looks like a down arrow. v
The reason why vi used these keys for moving the cursor instead of the arrow
keys is because the computer keyboard that was used to develop vi did not
have them (see second image in introduction). Nowadays, you use the arrow keys
to move the cursor as well. However, it is recommended to use hjkl because
then you do not need to move your hand to a different part of the keyboard.
Try moving around in this text with hjkl. Bonus: next time you’re scrolling
Facebook, try out the j and k keys to scroll through your feed! This
special feature in Facebook is a nod to the long legacy of vi in the hacker
and computer science worlds.
Vim also allows you to move the cursor by words:
w: move cursor one word forwarde: move cursor forward to end of wordb: move cursor one word backward
This is just a line with words you can move around in.
If you try out these word cursor movements, you might noticed that the cursor does not skip past non-letter characters like commas, parentheses, periods etcetera. You can skip these by using the uppercase versions of these commands.
W: move cursor one WORD forwardE: move cursor forward to end of WORDB: move cursor one WORD backward
The definition of a WORD in Vim is any sequence of non-blank characters, separated with white space.
Try out these keystrokes in the Python snippet below to get a feel of the difference between moving your cursor over words versus WORDS.
def factorial(x): if x==0: return 1 else: return x * factorial(x - 1)
Any of these motions can be preceded with a number to repeat the motion a
specified number of times. For example, typing 4l will move the cursor 4
characters to the right.
The following commands are for moving quickly within a line (try it out):
0: move cursor to first character of line^: move cursor to first non-blank character of line$: move cursor to last character of line
The following commands are for moving quickly within a file (try it out):
gg: move cursor to first line of fileG: move cursor to last line of file
These commands can be preceded with a number to go to a specific line in the
file. For example, typing 441gg or 441G will move the cursor to line 441.
Scrolling
In addition to moving the cursor, Vim also provides commands for scrolling. Scrolling is distinct from cursor motion because its purpose is to display a different part of the file on the screen, not to move the cursor. Scrolling can indirectly move the cursor when the cursor would otherwise go out of the screen, but in that case the cursor movement is a secondary effect of scrolling.
Try out these scrolling commands to scroll by a single line, a half-page and a full-page, respectively.
CTRL-Y,CTRL-E: single-line scrollingCTRL-U,CTRL-D: half-page scrollingCTRL-B,CTRL-F: full-page scrolling
The following commands are useful to move the screen relative to the cursor (try it out):
zz: center screen on cursorzt: scroll screen so that cursor is on the first linezb: scroll screen so that cursor is on the last line
Insertion
Vim provides multiple basic commands for entering insertion mode. These commands differ in the place where text insertion starts starts relative to the cursor. The most basic ones are:
i(insert): start insertion mode before cursora(append): start insertion mode after cursor
Try these commands out here:
There is text misng this . There is some text missing from this line.
The uppercase versions of these commands are similar, but start insertion mode in a position relative to the line rather than the cursor:
I: start insertion mode before the first non-blank character in the lineA: start insertion mode at the end of the line
Try these commands out here:
There is some text missing from th There is some text missing from this line.
some text missing here. There is also some text missing here.
You can also start create a new line above or below the cursor and start insertion mode:
o: create new line below current line and start insertion modeO: create new line above current line and start insertion mode
Try these commands to insert the missing lines:
This is line 1. This is line 3. This is line 5.
Deletion
Use these normal mode commands to delete the characters before and after the cursor:
x: delete character after the cursorX: delete character before the cursor
Fix this line using the commands:
The ccow jumpedd ovverr thhe mooon.
There is also a command to delete whole lines:
dd: delete line
Use the command dd to delete the second, fourth and fifth lines in this
phrase. Use 2dd to delete the fourth and fifth lines with one command!
Roses are red, Mud is fun, Violets are blue, I have a car, Clocks tell time, Sugar is sweet And so are you.
J: join two lines
You can only delete the newlines between two separate line to join them.
Use J to join the following lines:
This is line 1. This is line 2. This is line 3.
Yanking and putting
Because of its long history, the terminology for copy-and-paste in Vim evolved somewhat differently. Instead of copying text, we speak of yanking text. Moreover, pasting text it putting text. The corresponding commands are:
y: yank selected textp: put yanked text after cursorP: put yanked text before cursor
In order to select text, we need to enter visual mode. When you enter visual mode characterwise, Vim remembers the position where the cursor was when you entered visual mode as the anchor. When you move the cursor, the selected text is the text between the anchor and your cursor. You can also switch the anchor and the cursor.
v: enter visual mode characterwiseo: switch anchor and cursor position
Use v, y and p to select the text in line 1 just before “first” and paste
it on the line 2. Then, append the word “second”. Finally, yank and paste the
text after “first” to line 2.
1) This is the first line. 2)
V: visual mode linewise
Oftentimes, we need to yank whole lines. Although it is possible to yank whole
lines using characterwise visual mode, Vim provides a linewise visual mode to
select a range of whole lines quicker. Use V to yank the missing lines from
the first paragraph and put them in the right place in the second paragraph.
This is line 1. This is line 2. This is line 3. This is line 4. This is line 5.
This is line 3. This is line 5.
Y: yank current line
You can also use Y to instantly yank the whole line that the cursor is in.
Repeat the line below using Y and p.
Repeat this line.
CTRL-V: visual mode blockwise
Finally, there is the blockwise visual mode. Instead of selecting contiguous
characters or lines, this mode allows you to select blocks of text. Use
blockwise visual mode to yank the int declarations of a, b and c to and put
them in front of d, e and f with P.
int a; int b; int c;
d; e; f;
Undo and redo
u: undo last changeCTRL-R: redo last undone change
Vim remembers everything you do and allows you to trace back through your edit
history using u and CTRL-R. Fix the sentence below and use these commands
to trace through your edit history.
Thiis iss a sentttenccce.
Saving and exiting
:w[rite]: write buffer:w[rite] {file}: write buffer to{file}:e[dit] {file}: edit{file}
In order to save a file, you can use the ex command :write. In order to
save typing, you can just type :w. If you add an optional filename, Vim will
write to the specified file instead. However, Vim will not switch to editing
the new file and further calls to :w will still write to the file you were
originally editing. To start editing a different file from the one you are
currently editing use the ex command :edit.
Try out these commands by saving the current buffer to test.md using :w
test.md and then switch to the new file using :e test.md.
:sav[eas] {file}: save current buffer to{file}and switch to{file}
You can write to a file and immediately switch to the new file by the ex
command :saveas. Try this out by typing the command :sav new_test.md.
:q[uit]: quit current buffer
You can quit Vim using the ex command :quit. Try quitting Vim and then
reopen this file.
:wq: write and quit current buffer
When you are done editing a file, you can write the file and then quit by using
the single command :wq.
Vim help
Vim is complex and has many commands. Fortunately, the builtin Vim documentation is very comprehensive and is easy to consult whilst you are editing. The Vim documentation is split into two main parts. The user manual introduces and explains Vim concepts from simple to complex and reads from start to end like a textbook. This is the best resource to get acquainted with Vim features. The reference manual on the other hand is a no-frills explanation of how exactly Vim works. This is good for reminding yourself of how something works and to dig deeper into Vim, but less suitable for learning about a Vim feature for the first time.
:help: open main help fileCTRL-W CTRL-W: switch windowCTRL-]: follow tagCTRL-T: return to previous tag
You can open the main Vim help file by the ex command :help. This opens up
Vim help in a new window. You can switch between windows using CTRL-W
CTRL-W. Moreover, you exit the Vim help window with :q. When you are in
the Vim help window, you can move the cursor around with the same commands you
have been using to move around in regular files. The words coloured in light
blue are tags. These tags redirect you to other help files and work in the
same way that hyperlinks do in web pages. To “click” on a tag, position your
cursor on a tag and press CTRL-]. You can return to the previous help file
with the command CTRL-T.
:help usr_toc: table of contents of user manual:help usr_nn: open chapter nn of user manual:help nn.m: open chapter nn of user manual on section m
The user manual is split into chapters. You can access the table of contents
with the command :help usr_toc. Moreover, you can access individual chapters
directly by typing :help usr_nn, where nn is the chapter index. You can also
directly skip to a particular section of a particular chapter with :help
nn.m. As an exercise, view chapter 1 with :help usr_01 and section 2 of
chapter 3 with :help 03.2.
:help CTRL-U: get help on normal mode command CTRL-U:help i_CTRL-W: get help on insert mode command CTRL-W:help v_o: get help on visual mode command o
If you need help on a specific keystroke, you can quickly pull up the reference
manual entry using :help followed by the corresponding keystroke. Because
Vim is a modal editor, the meaning of keystrokes depends on the mode that you
are in. Thus, when you are getting the help for a keystroke, you need to
specify which mode you are searching for. For normal mode commands, no prefix
is needed. For insert and visual mode commands, you need to prepend the
keystroke with the prefixed i_ and v_, respectively.
:help :tabnew: get help onexcommand :tabnew
To get help for an ex command, type :help followed by a colon and the ex
command.
:help windows: get help on the topic of windows
You can also find help on specific topics, such as windows.
:help 02.8:help help-summary
For more information on how to find help, check out section 8 of chapter 2 of
the user manual using :help 02.8. Also, :help help-summary provides a good
summary of how to use Vim help. From here on, every section will start with a
number of :help commands that refer to the Vim help pages relevant to that
section.
Search & substitution
:help 03.8:help 03.9:help usr_27.txt:help pattern.txt/pattern: search for pattern forwardsn: find next occurrence of patternN: find previous occurrence of pattern
In order to search for a word, type / followed by the word. Vim will then
look for the next match after the cursor. The command n searches for the
next occurrence of the word and N searches for the next match backwards. Try
looking for the next 5 matches for the word pattern.
?pattern: search for pattern backwards
You can also initiate a search using ?. The difference is that ? will
search backwards for the next match. Note that using n will continue to
search backwards and N will search forwards.
:s[ubstitute]/pattern/substitution/options
Using the ex command :substitute, you can search for words in the current
line and replace them with another word. You can also specify a number of
options to the search. Useful options include g and c. The option g
will perform the substitution on all matches instead of just the first. The
option c makes Vim ask for permission before performing each substitution.
Replace “thee” by “the” in the sentence below using the command
:s/thee/the/gc.
thee best time to see thee flowers is in thee spring.
By default, the :substitute command only acts on the line that your cursor is
in. You can also perform substitutions on visually selected text. Moreover,
you can prefix the substitute command with a particular range of lines. A
special case is the percent sign %, which specifies that the substitution
takes place over the entire file, like :%s/pattern/substitution/options.
*: find next occurrence of word under cursor#: find previous occurrence of word under cursor
If you are trying to find other occurrences of a particular word in your text,
you can save time typing by moving your cursor over the word and using the *
or # command. This will look for the next occurrence of the word forwards and
backwards, respectively.
The Grammar of Vim
:help usr_03.txt:help usr_04.txt:help motion.txt- Learn to speak vim - verbs, nouns, and modifiers!
You have now learned the basic commands for moving around in Vim, as well as commands for inserting, deleting, yanking and putting text. The true power of Vim lies in combining basic commands to quickly perform complex editing tasks. You can think of Vim as having a language. You give instructions to Vim using “sentences” consisting of a verb, modifier and noun. The “verbs” are Vim operators, which are:
d: deletec: changey: yank
The d operator deletes text. The c operator deletes text as well, but also
puts you into insertion mode. Lastly, the y operator yanks text.
Operator + motion
You can combine any of these operators with a cursor motion. The operator will
then act on the text that you move over. For example, move your cursor to the
beginning of coconut in the sentence below and then delete a word with the
command dw. In this case, d is the verb and w is the noun.
This is a perfectly normal coconut sentence.
You can add a count to any motion command, so you can use the same principle to
delete any number of consecutive words. Use the command d3w to delete all
the ERRORs in this sentence. Now we have added the modifier 3.
I have found ERROR ERROR ERROR a nice solution.
You can combine operators with any cursor motion. As an example, move the
cursor to the space after the first sentence below and type d$ to delete
until the end of the line.
The beginning of this line makes sense. The arcsin of the moon equals three.
As an exercise, use the c operator in combination with w to change blue
to red in this sentence.
Roses are blue.
As another exercise, use the y operator in combination with w to yank the
word double and paste it before the variable b using P.
double a; b;
Visual mode + operator
When you use an operator in visual mode, it will take effect on the selected text. Repeat the changes you did previously, but use visual mode to first select the text you want to change and then use an operator.
This is a perfectly normal coconut sentence.
I have found ERROR ERROR ERROR a nice solution.
The beginning of this line makes sense. The arcsin of the moon equals three.
Roses are blue.
double a; b;
Operator repetition
When you type an operator twice, it will affect the entire line. Use dd to
delete the middle line.
This is the first line. This line needs to deleted. This is the last line.
Use yy to copy the first line and put it below the second line.
Copy this line. To below this line.
Use cc to change this line to something else.
Change this line.
Advanced motion
:help usr_03:help usr_04:help motion.txt
Now that you know how to combine operators and motions, it is time to learn more advanced cursor motion commands.
Search pattern
Previously, we learned about searching using / and ?. It turns out that
searching for a match is also a cursor motion that you can combine with
operators. As an example, position your cursor on the line below Where am
I?. Then type d/Here<Enter> to delete until the first match of Here.
Where am
I?
Pineapple pen!
Here I am!
Single-character search
f: find charactert: till character
When you type f followed by a character, the cursor will search forward on
the current line for the first occurrence of that character and move to that
position. The t command is similar, but it moves the cursor to the character
before the match. As an exercise, move your cursor to the beginning of the
line below and press ff to move the cursor to f of fruits. Then type
ct: to change the text up until : and replace the text by vegetables.
These are some fruits: lettuce, carrots and peas.
F: find character backwardsT: till character backwards
The capitalised versions of these commands are similar, but search backwards.
As an exercise, move your cursor to the end of the line below and type F: to
move the cursor to :. Then type cT<Space> to change colours to
animals.
These are some colours: cat, dog, rabbit.
Matching parenthesis
%: move to matching parenthesis
When your cursor is on a parenthesis, the percent sign % command moves the
cursor to the matching parenthesis. This also works for curly, square and
angled brackets ({}, [], <>). As an exercise, move around using the %
in the Python expression below.
norm_pdf = 1.0 / sqrt(2 * pi * s**2) * exp( - (x - mu)**2 / (2 s**2) )
Text-object motion
{}: Move to previous/next paragraph(): Move to previous/next sentence
Another great feature of Vim is that it understands “text-objects” like
sentences and paragraphs. You can move through sentences using curly braces
{} and through paragraphs using parentheses (). As an exercise, use these
commands to move around in the text below.
Communications of the ACM, Vol. 11, No. 3, March 1968, pp. 147-148
Go To Statement Considered Harmful
Edsger W. Dijkstra
For a number of years I have been familiar with the observation that the quality of programmers is a decreasing function of the density of go to statements in the programs they produce. More recently I discovered why the use of the go to statement has such disastrous effects, and I became convinced that the go to statement should be abolished from all “higher level” programming languages (i.e. everything except, perhaps, plain machine code). At that time I did not attach too much importance to this discovery; I now submit my considerations for publication because in very recent discussions in which the subject turned up, I have been urged to do so.
My first remark is that, although the programmer’s activity ends when he has constructed a correct program, the process taking place under control of his program is the true subject matter of his activity, for it is this process that has to accomplish the desired effect; it is this process that in its dynamic behavior has to satisfy the desired specifications. Yet, once the program has been made, the “making” of the corresponding process is delegated to the machine.
My second remark is that our intellectual powers are rather geared to master static relations and that our powers to visualize processes evolving in time are relatively poorly developed. For that reason we should do (as wise programmers aware of our limitations) our utmost to shorten the conceptual gap between the static program and the dynamic process, to make the correspondence between the program (spread out in text space) and the process (spread out in time) as trivial as possible.
Let us now consider how we can characterize the progress of a process. (You may think about this question in a very concrete manner: suppose that a process, considered as a time succession of actions, is stopped after an arbitrary action, what data do we have to fix in order that we can redo the process until the very same point?) If the program text is a pure concatenation of, say, assignment statements (for the purpose of this discussion regarded as the descriptions of single actions) it is sufficient to point in the program text to a point between two successive action descriptions. (In the absence of go to statements I can permit myself the syntactic ambiguity in the last three words of the previous sentence: if we parse them as “successive (action descriptions)” we mean successive in text space; if we parse as “(successive action) descriptions” we mean successive in time.) Let us call such a pointer to a suitable place in the text a “textual index.”
When we include conditional clauses (if B then A), alternative clauses (if B then A1 else A2), choice clauses as introduced by C. A. R. Hoare (case[i] of (A1, A2,···, An)), or conditional expressions as introduced by J. McCarthy (B1 -> E1, B2 -> E2, ···, Bn -> En), the fact remains that the progress of the process remains characterized by a single textual index.
As soon as we include in our language procedures we must admit that a single textual index is no longer sufficient. In the case that a textual index points to the interior of a procedure body the dynamic progress is only characterized when we also give to which call of the procedure we refer. With the inclusion of procedures we can characterize the progress of the process via a sequence of textual indices, the length of this sequence being equal to the dynamic depth of procedure calling.
Let us now consider repetition clauses (like, while B repeat A or repeat A until B). Logically speaking, such clauses are now superfluous, because we can express repetition with the aid of recursive procedures. For reasons of realism I don’t wish to exclude them: on the one hand, repetition clauses can be implemented quite comfortably with present day finite equipment; on the other hand, the reasoning pattern known as “induction” makes us well equipped to retain our intellectual grasp on the processes generated by repetition clauses. With the inclusion of the repetition clauses textual indices are no longer sufficient to describe the dynamic progress of the process. With each entry into a repetition clause, however, we can associate a so-called “dynamic index,” inexorably counting the ordinal number of the corresponding current repetition. As repetition clauses (just as procedure calls) may be applied nestedly, we find that now the progress of the process can always be uniquely characterized by a (mixed) sequence of textual and/or dynamic indices.
The main point is that the values of these indices are outside programmer’s control; they are generated (either by the write-up of his program or by the dynamic evolution of the process) whether he wishes or not. They provide independent coordinates in which to describe the progress of the process.
Why do we need such independent coordinates? The reason is - and this seems to be inherent to sequential processes - that we can interpret the value of a variable only with respect to the progress of the process. If we wish to count the number, n say, of people in an initially empty room, we can achieve this by increasing n by one whenever we see someone entering the room. In the in-between moment that we have observed someone entering the room but have not yet performed the subsequent increase of n, its value equals the number of people in the room minus one! The unbridled use of the go to statement has an immediate consequence that it becomes terribly hard to find a meaningful set of coordinates in which to describe the process progress. Usually, people take into account as well the values of some well chosen variables, but this is out of the question because it is relative to the progress that the meaning of these values is to be understood! With the go to statement one can, of course, still describe the progress uniquely by a counter counting the number of actions performed since program start (viz. a kind of normalized clock). The difficulty is that such a coordinate, although unique, is utterly unhelpful. In such a coordinate system it becomes an extremely complicated affair to define all those points of progress where, say, n equals the number of persons in the room minus one!
The go to statement as it stands is just too primitive; it is too much an invitation to make a mess of one’s program. One can regard and appreciate the clauses considered as bridling its use. I do not claim that the clauses mentioned are exhaustive in the sense that they will satisfy all needs, but whatever clauses are suggested (e.g. abortion clauses) they should satisfy the requirement that a programmer independent coordinate system can be maintained to describe the process in a helpful and manageable way.
It is hard to end this with a fair acknowledgment. Am I to judge by whom my thinking has been influenced? It is fairly obvious that I am not uninfluenced by Peter Landin and Christopher Strachey. Finally I should like to record (as I remember it quite distinctly) how Heinz Zemanek at the pre-ALGOL meeting in early 1959 in Copenhagen quite explicitly expressed his doubts whether the go to statement should be treated on equal syntactic footing with the assignment statement. To a modest extent I blame myself for not having then drawn the consequences of his remark
The remark about the undesirability of the go to statement is far from new. I remember having read the explicit recommendation to restrict the use of the go to statement to alarm exits, but I have not been able to trace it; presumably, it has been made by C. A. R. Hoare. In [1, Sec. 3.2.1.] Wirth and Hoare together make a remark in the same direction in motivating the case construction: “Like the conditional, it mirrors the dynamic structure of a program more clearly than go to statements and switches, and it eliminates the need for introducing a large number of labels in the program.”
In [2] Guiseppe Jacopini seems to have proved the (logical) superfluousness of the go to statement. The exercise to translate an arbitrary flow diagram more or less mechanically into a jump-less one, however, is not to be recommended. Then the resulting flow diagram cannot be expected to be more transparent than the original one.
References:
[1] Wirth, Niklaus, and Hoare C. A. R. A contribution to the development of ALGOL. Comm. ACM 9 (June 1966), 413-432.
[2] Böhm, Corrado, and Jacopini Guiseppe. Flow diagrams, Turing machines and languages with only two formation rules. Comm. ACM 9 (May 1966), 366-371.
Text objects
:help 04.8:help text-objects
So far, we have combined operators with cursor motions and visual mode selections. There is one more type of Vim grammar that is incredibly useful. Previously, we established that Vim recognises text-objects like sentences and paragraphs. In this section we learn how to combine operators with text-objects.
Words
- operator +
iw: inner word - operator +
aw: a word
When your cursor is within a word, you can combine an operator with iw to
operate on the “inner word” and aw to operator on the “outer word”. The
difference between the inner and outer word is that the outer word includes the
whitespace up to the next word. As an exercise, move your cursor to any
character in the word hiccup and type daw. Then move your cursor to any
character in sentences and type ciw to change it to words. Finally, move
your cursor to any character in donkey and type daw.
There are some hiccup strange sentences donkey in this sentence.
Sentences and paragraphs
- operator +
is: inner sentence - operator +
as: a sentence - operator +
ip: inner paragraph - operator +
ap: a paragraph
Similarly, we can operate on whole sentences and paragraphs. As an exercise,
use the command das to delete the English sentence in the paragraph below.
Then use dap to delete the second paragraph.
Vivamus, mea Lesbia, atque amemus, rumoresque senum severiorum omnes unius aestimemus assis. This sentence does not quite belong here. soles occidere et redire possunt: nobis, cum semel occidit brevis lux, nox est perpetua una dormienda. da mi basia mille, deinde centum, dein mille altera, dein secunda centum, deinde usque altera mille, deinde centum, dein, cum milia multa fecerimus, conturbabimus illa, ne sciamus, aut ne quis malus invidere possit, cum tantum sciat esse basiorum.
I kissed a girl and I liked it, the taste of her cherry chapstick. I kissed a girl just to try it, I hope my boyfriend don’t mind it. It felt so wrong, it felt so right. Don’t mean I’m in love tonight. I kissed a girl and I liked it (I liked it).
Flavi, delicias tuas Catullo, ni sint inlepidae atque inelegantes, velles dicere, nec tacere posses. verum nescio quid febriculosi scorti diligis: hoc pudet fateri. nam te non viduas iacere noctes nequiquam tacitum cubile clamat sertis ac Syrio fragrans olivo, pulvinusque peraeque et hic et ille attritus, tremulique quassa lecti argutatio inambulatioque. nam nil stupra valet, nihil, tacere. cur? non tam latera ecfututa pandas, ni tu quid facias ineptiarum. quare, quidquid habes boni malique, dic nobis: volo te ac tuos amores ad caelum lepido vocare versu.
Blocks
- operator +
i(: inner()block - operator +
a(: a()block - same for
[],{},<>,"",'',``
Finally, Vim also recognises text between brackets like parentheses as text
objects. For this type of text objects, operating on an “inner” () block
means to operate on the text within parentheses. Operating on an outer ()
block includes the parentheses themselves. As an exercise, type da( or da)
to delete first () block below. Then use ci( or ci) to change the text
in the second () block to something else.
What follows is in parentheses (delete this including the parentheses). (Change me to something else)
You can do the same for square, curly and angled brackets.
What follows is in square brackets [delete this including the square brackets]. [Change me to something else]
What follows is in curly brackets {delete this including the curly brackets}. {Change me to something else}
What follows is in angled brackets <delete this including the angled brackets>. <Change me to something else>
Text between double quotes " are treated as text-objects in a similar manner,
but only if the first and second quote are on the same line. This restriction
comes from the fact that there is no difference between an opening quote and a
closing quote like there is for brackets.
What follows is in double quotes “delete this including the double quotes”. “Change me to something else”
You can do the same for single quotes and backticks.
What follows is in single quotes ‘delete this including the single quotes’. ‘Change me to something else’
What follows is in backticks delete this including the backticks.
Change me to something else
Extra topics
We have now reached the end of this report. However, there is much more to discover about Vim. Here are some extra resources where you can learn more about Vim.
Also, I have compiled a list of advanced Vim topics and their help pages that I think are worth looking into and that I would cover in an advanced Vim tutorial.
Repeating things
:help usr_27:help repeat.txt
Completion
:help 24.3:help ins-completion
Windows
:help usr_08:help windows.txt
Registers
:help 04.6:help registers
Macros
:help 05.3:help map.txt
Tags
:help usr_29:help tagsrch
Configuration
:help usr_05
Tabs
:help tabpage.txt
Written by Thomas Pak